
Many years ago I owned and loved a dark blue Fiat 850 sport coupe. I have always loved small rear engine cars so when the chance came to own another I decided that we only go around once and it is better regret doing something than to regret not doing something.
I found Primo for sale on Leboncoin.fr which is a French site for selling everything. It was not far away and seemed reasonably priced. Good ones sell for more than £10,000 these days and the extremely rare Abarth versions can fetch a lot more. There is an Abarth 1000 OT on sale in the States, they are asking over $90,000! Whether it sells for that is anyone’s guess but it shows that there are people out there who can see where the next big money is to be made.
The 850 Sport was made from 65 to 71 and in that time it saw two updates. The series one had a smoother look and only two headlights, no chrome at the rear. The series two is the best looking in my opinion and the series three with its not very pretty front end. Apart from these details they were pretty much the same car. US versions of early cars had an engine with 817cc to get around the emissions laws.
The 850 Sport Coupé is an appreciating classic and a fairly practical proposition to run every day. Parts are still available although some are getting extremely hard to find. The Internet has been of immense help in this respect, sourcing parts that would be impossible to find any other way. Maybe it is easier to restore a classic car these days simply because of this.

Primo as bought. Nasty wheels of different widths and silly white lines and dull paint and chrome.
And for sure Primo needed a whole heap of work. Let’s look at the up side. The chassis is in fabulous condition for its age. The body has only been sprayed once and although it could do with a respray he looks ok for now. There are issues far more pressing than the aesthetics.
The engine and box are pretty good. The previous owner (PO) did some good work but tended to be a bit simplistic, perhaps underestimating the sheer amount of effort, research and detail that goes into a good restoration. To be fair the PO wanted to turn the car into a Hill Climber but I think that would have been a shame. He replaced the knackered original 903 engine with the 70 HP one out of the Autobianchi A112 Abarth.

The PO fitted the 70HP Abarth engine from the Autobianchi.
This is a popular way to get more power but it is not without it’s problems. The biggest issue is that the A112 engine spins the wrong way. The original engine runs counter clockwise which is unusual so first you have to make it run backwards. This part isn’t too hard, turn the pistons around, fit an 850 cam and the 850 starter motor. The hard part is getting the cooling system to work.
The block on the 850 engine uses a 4 bolt pump which also houses the fan assembly. It’s a long alloy casting. You can’t use a pump from another engine as they all spin the wrong way. The A112 engine has a three bolt mounting. The three bolts do line up with the 850 pump so that could be easily solved with an alloy spacer and two gaskets. The problem is that the pump does not align with the radiator so it needs major surgery to put it in the right place.
None of this is impossible but it is not easy either. The PO’s solution was to fit an electric water pump and an electric fan in place of the mechanical system on the original set up. The PO could never get the car to cool enough and now that I have owned the car for a while I can understand why.
Putting a radiator in the back of a car next to the engine was never going to be ideal but a well set up and maintained original cooling system can be very effective even if it does rob HP from the engine spinning the fan the whole time.
There were many reasons why the car was not cooling. The first is that the fan needs to push, not suck and the fan fitted has to run the wrong way to do that. It’s not very efficient. There are also supposed to be plates fitted around and under the engine to allow the hot air from the radiator to get sucked out under the car. Without these plates the heat just goes straight back up and into the radiator.
There are a load of other reasons too, like the way the engine was set up, a poorly running engine has to work harder and so gets hotter. At the moment the car still has this electrical cooling set up and apart from the odd steep hill taken at speed the car is quite drivable but at some point I want to put it back the way it was. If there is one thing I’ve learned over the years it’s that those engineers back in the late 60’s knew exactly what they were doing and it is hard to do better.
Some people put a radiator at the front of the car but that would ruin its originality and a big hole would have to be cut out of it, plus it ruins the boot space which isn’t enormous but still big enough to take a large rucksack.
So since I have owned Primo I have been improving and fault finding. Luckily the car was quite drivable although not very nice to drive. Everything worked and it went through a control technique at the first attempt and that was the day after I bought the car. I did nothing to it and was expecting a long list of faults. But apart from a handful of advisories like an oil leak (crank oil seal, since fixed) and missing dust covers on shocks, badly adjusted headlight etc it actually passed which surprised me. Maybe they like old cars.
The first thing to do was remove the white stripes and the roundels from the doors. I did this with gentle heat from a hot air gun but even so I still managed to pull some paint off but this was helpful to use as a sample to get the paint code. The original colour was dark green and I have no idea what the current colour is. I have to say I like it a lot. It suits the car and really stands out against the drab shoe boxes that pass for cars today.

This is the interior of Primo when I bought him. Since this photo was taken the alloy floors and bucket seats have gone. The dash and door cards are all worn, distorted, broken and cracked. The steering wheel is the wrong one.
Next to go were the ridiculous alloy floor mats and bucket seats. I sold them along with a load of wheels that came with the car that I had no use for. The car came with the original seats although they are in a right old state though still useable, just ugly split, sagged worn and tired. No surprise after 46 years.

The incredibly rare Azor wheels, now polished and painted.
Original seats back in, it was time to clean up the 4 wheels of the bunch that looked like they might be rather good. The PO had painted them matt black and decided not to fit them to the car for some reason, choosing instead two different pairs to fit on the car. Nasty alloy wheels with steel rims. Heavy too. The ones now fitted to the car look fabulous and suit it really well. I can’t understand why he didn’t do this himself. With the wheels polished and painted the car looks almost presentable.

Primo in the evening light. He doesn’t look too bad for a 46 year old car.
Since then the work list has been almost endless. The repair or replacement of one part highlighting even more un noticed issues. Since the brakes worked well enough I decided to start on the suspension. All the wheels looked bockety. It was clear that all the bushes were shagged and the front kingpins quite worn. There was an annoying knock from the back end and the front brake pads rattled annoyingly. The passenger side window would wind down all by itself as you drove along. With no carpets it was a cacophony of noise and very tiring.
The wipers worked for the control technique but failed soon after. Luckily here is a car that you can repair so I pulled out the motor and cleaned up its innards and now it is working again. The washer button was completely rotten and one of the tubes to the washer had been clamped between the heater and the bulkhead. It seems that every aspect of the car needs some attention.
An oil leak from a poorly tightened nut brought to light two loose bolts on the bell housing! The engine and gearbox mounts have all been changed as have all the bushings on the suspension. I bought an Abarth front spring with inverted eyes which should lower the car about 25mm but didn’t seem to be as low as I would has suspected.
The knock from the back end turned out to be a tired shock absorber so I fitted a pair of Spax adjustables at the rear and a pair of new standard shocks at the front.
The more I look, the more issues I find. The brake lines were done relatively recently but the discs, pads and shoes are all very worn although the brakes work well enough for now. The remote reservoir for the brake fluid is mounted under the bonnet at the front and due to age, the plastic tube joining the master cylinder to the reservoir is tired and hard and slowly leaking brake fluid. Now replaced with Tygon 2375 tubing and the correct clips and not a Jubilee clip which doesn’t tighten properly.
Once the suspension was more or less sorted it was time to have a look at the engine. It started well and ran OK but it would not tick over and had a lot of flat spots.
No surprise, I found the points too closed, the plugs all dirty, the accelerator pump on the carb not working and all the tappets very out of adjustment. Once all this was done the engine ran a lot nicer but still would not tick over. The main venturi shaft was worn. The only solution was a whole new carb, bought for £300.
Now the car ticks over nicely and it runs and revs well. You need to rev the car to get it to move but cane it and it goes quite quickly. Quick enough to surprise a few people on the roads. Surely no one expects an old classic to be fast.
Now that the suspension is sorted Primo is very smooth and has a comfy compliant ride. He pitches slightly but that is due to the stiff front end with little weight in it and a short wheelbase. He handles the speed bumps as well as any car and there are one or two that can be taken at 40 mph. He just flies over them. It’s actually more comfy than at 10 mph!
It might seem like a primitive car but the suspension is very clever. All independent and with geometry that helps the car around corners. It really is eager. I find my self turning in much earlier in Primo than I would do in other cars. He is quite nimble through the bends, the steering is light and the big wheel means quite a lot of movement to get around the tighter corners. At the time the 850 Sport Coupé was praised for its brakes and handling, not to mention the fun of it.
Modern cars are all very impressive and for sure they are faster and safer than the 850 sport but are they as much fun? Get Primo wound up in third and find a nice wiggly road and away you go. If you get a series of corners in quick succession and get it right you will be left smiling. The fact that you’re having all this fun and not breaking the speed limit unduly is but a plus.
The PO fitted a ‘sports’ exhaust. It’s based on the Abarth one. The pipe is half efficient, as it has 4 separate downpipes but then they become two and then these two pipes go in to the silencer at almost a 90 degree angle. Not a very efficient system. It may be that the original exhaust is more efficient. It will certainly be quieter. As a driver of a classic car it is your duty to ensure that the car makes the right noises. It’s a bit noisy but has a nice bark. Everyone seams to like it. It sounds better outside the car than from within. In the years to come I intend to tune Primo but I am not going to go the traditional way. These little engines are tough. I read somewhere that unmodified they can run to 12,000 rpm with no modification. Seems unlikely to me but who can say. What is sure, they don’t mind being revved to normal limits. If you want to get anywhere you have to rev the engine. The engine will happily rev to 8000 before the valves start bouncing. Not bad for a standard engine.
There are an unbelievable amount of racing and tuning companies and small garage specialists out there catering for Fiat and if you wanted you could easily spend way more than the price of the car on trick suspension and engine mods.
The 850 engine and indeed the A112 has a shared inlet manifold and what this means is that the engine is not super efficient as it is hard for the fuel to make it properly to the far cylinders. There are a few solutions to this problem. There are no less than three special 8 port cylinder heads available for these engines. There is a Vizza head which is a 850 head welded up and then modified to have 4 separate inlets ports.

This is the Vizza 8 port head for the 850 and A112 engines.
Then there is the PBS head. As far as I understand it is cast to order and is not a modified head but a whole new one. Both the Vizza and PBS heads cost about 3000€! But do allow the option to fit large downdraught carbs.

This is the PBS head from Scuderia Topolino
If you’re feeling really flush you could always buy the TCR head for 5000€! It is like a twin cam but uses the original push rods. Clever stuff and with this head 120 hp is possible.

At 5000€ not for everyone but if you’re after serious power it is possible!
There have been many experiments with the 850 engine over the years and one of the most interesting is the fitting of a Suzuki jeep cylinder head with an overhead camshaft. It seems that the cylinder spacing is close enough to allow it to be fitted although not without some serious modification.
For me the problem is that I do not want an engine that doesn’t come on song until 3000 rpm and revs screaming to 8000 plus. I prefer something more drivable. My idea is to install a small supercharger. That way there will be more torque and that is what I am after. I don’t mind standing out by driving an old timer but I do mind standing out by making too much noise and drawing attention to myself. The fastest cars are always the quietest.
However that is a long way in the future. For now I will be happy to have a mechanically sound vehicle that is reliable that I can drive every day and even go on distant adventures.
One thing I did do that was well worth it was to cover all the panels with Silent Coat. It’s a kind of bitumen/plastic polymer with an alloy skin. It is about 2 mm thick and self adhesive. It comes in small panels about 350 x 250 mm. I bought 80 sheets and surprisingly used every last one of them and I have not covered every where.

Silent coat sound deadening. It is everywhere and makes a huge difference to the way the car feels.
The entire floor and wheel arches have been covered. The engine bulkhead is also covered and has additional soundproofing in the way of a 10 mm foam. Later there will be more soundproofing and carpets too. I am determined to make Primo a very comfy and quiet car.
The Silent Coat went into the doors and now they shut with a quality clunk instead of a teeth grating clang. I put it inside the front and rear wings too and the roof and bonnet. The difference is quite something. The car just feels more solid. Not massively quieter but nicer. Much nicer.
Electrics next. You can only ignore Fiat electrics for so long. If you neglect them because you fear them you will eventually find yourself stranded on the side of the road, one cold winters night. A familiarity with your cars electrics is also very handy if you do get stranded anyway.
The first thing I did was to install a pair of relays for the headlights with a new power feed coming direct from the batteries. Before this all the power was going through the ignition switch, headlight switch, fuse box and then to the headlights. Standard bulbs are 40 watt which is pathetic but already the limit for the light’s system. Now relays are fitted I have installed brighter halogen bulbs and the difference is amazing. I can now actually see the road at night. Main beam is particularly impressive with all 4 bulbs on throwing nearly 250 watts out.
Where to start? At the deep end I thought and started by ripping out all the dead wire. Stuff that had been added for no reason that I could see and tidied up the loom by re routing wires until it all sat better. Then I went through all the connectors and cleaned them or if dubious would just cut off the terminal and put a new one on.
The dashboard had one light showing and that was the charge light. The only one that worked and it is supposed to go out with the engine running but glowed all the time.

The dash as it came with the car, peeling wood, sagged and distorted shape, cracked and bent cowl and numerous needless holes. Interior light not working and only one dash light.
The dash was in a right state. You can’t really see if from the photo but the cowl was cracked and had lost its sweet curve. PVC was flaking from the top exposing the 46 year old foam. The dash was sagged, broken and distorted. And cracked. The real wood trim was warped and split and falling out. The dash vents were not held in and the windscreen washer pump was rotten.
The speedo works but over reads by about 20 kph. I have decided to buy a replacement from ‘The Speedometer Shop’ for a reasonable 100€. The one fitted is also damaged. Someone ham fisted had been in there and didn’t know what they were doing. They had not aligned the numbers correctly so the whole time the dash would make a small but annoying click. I suppose this says much for the Silent Coat that I had not been able to hear it before!
The rev counter seems to work ok but I cannot know how accurate it is unless I test it alongside something more accurate.
These dashboards are as rare as rocking horse shit. They are made of formed paper/cardboard and then covered in PVC and foam. Replicating this dash would be extremely difficult. I tried to find a good one but they don’t come up often and when they do they all have the same problems and are either warped, cracked or split.
There is a company in the states called Just Dashes who reckon they can rebuild one for about $1100 which isn’t bad. I doubt that includes the wooden sections either. I did find a fairly good dash on ebay which I have bought with a mind to seeing what they can do with it. In the mean time I had to make do with what I have got.
The first thing I did was to screw the dash down properly in the car and then while it was in the correct place repaired the split by the lower part of the cowl using epoxy resin and some fabric.
Then I had to break the tension out of the top edge where the dash sags between the mounting screws. There would be little point trying to get it to hold a new shape with that tension still in the structure. I got a bit brutal and bent the cardboard back and forth and wet it as well. I then clamped a piece of wood across the lower end and left it to dry.
Then I painted epoxy on the inside of the dash to fix the new position. It is much better than before but perfection was never going to happen with a dash in such a state as that was. I tried to work around the PVC but it was impossible so in the end I pulled it all off using a hot air gun to soften it. I used car body filler to reshape the top surface. That was fun, especially the vents in the top of the dash. It took hours. I sprayed it and prepared it for the leather effect vinyl wrap material I had found.

The dash with vinyl removed, straightened, reinforced and filled.
This is an amazing product. It is very clever and the end result is not bad at all. It is very compliant but it has its limits. I was unable to get it to go over the cowl and the dash so in the end I had to do it in two parts. Anyway, it looks a million times better than it did. It will certainly do until I can either source a NOS one or get one restored well.

The dash covered with the ‘leather effect’ vinyl. A very clever product which cost about £30. To make a dash covering in leather would have involved a very complex set of panels that would have to be sewn together. By hand! Although missing the vertical grooves of the original it doesn’t look too bad. In any case, a vast improvement on what was there.
Most people would find making the wood part the most daunting and one often sees these dashes with the long piece of wood replaced but never the piece between the dash dials. And I’m not surprised either. It is just a mm or so thick has 4 extremely pointed ends and two extremely precise triangles cut in it for the indicator lamps to go. Plus the dials have to be stripped and the plastic rims are placed on and then have their tabs welded so putting it all back together is a challenge.

The wood now replaced with teak. Cutting the slots for the indicator arrows was challenging! This pic shows the unvarnished piece in place.
Fortunately I have no trouble working wood and although it was a far from easy thing to do it was possible. I started with a piece of solid teak which I stuck to the table with double sided tape. I then planed it down to a couple of mm thin. Then I glued some fabric on the back with epoxy to give it some strength so it could be worked and would not split once on the dash. I did not have the luxury of ready made veneer and a sharp punch to stamp out the pieces so I had to make it using saws, drills and small rotary sanders. They will receive a few coats of marine varnish which should protect them for some time.

This picture shows the newly restored and varnished dash sort of in place. Changed the Abarth steering wheel for an original plastic wood one. Much nicer to use and look at.
I found a very helpful electrical diagnostic publication on the Yahoo group for the 850. It was very helpful to identify the problem of the charge light that wouldn’t go out. It said if light stays on when engine is running (it was charging fine) check the relay under the wiper motor. I had a look and sure enough, there was a little relay. I replaced it and suddenly the light was working correctly! Small victories like this are to be savoured.
I replaced all the original broken bulbs with LEDs and managed to get every single light working correctly. Oil, lights, main beam, dash lights, the lot. Very pleased.
With the dash off it was time to find the one leak in the car. It was coming from where the driver’s side wiper arm goes through the bodywork. I soon worked out why this was leaking and that was because there was a shaped plastic spacer missing on that side. I fashioned a new on from plastic as the chances of finding a genuine one of those is pretty slim. Unless I bought another car to use for spares but as I have no space that isn’t an option for me and because Primo is my everyday car he cannot be off the road for weeks while I do things to him.
New tubing and a windscreen washer pump. Despite being operated by a finger the washers are perfectly effective and do not rely on electricity. Always a good thing. I removed the light switches and cleaned them up. Took the interior light switch apart and repaired that. I cleaned up the Ashtray and all the other chrome bits.
All this work just to get the dashboard done. The dash is one of the 850 sport’s best features so it is an important thing to get right. Next up are the seats. To be covered in black leather with new foam. They are normally PVC but why not leather? The door cards will also be leather, stitched up in the same style as the originals. Then carpets and soundproofing.
Stance

The way Primo is today. Not a bad stance but could still come down slightly at the front to balance out the look. I’m working on it.
The way a car sits is very important and the Fiat 850 sport is no exception. Most of them sit too low at the back and too high at the front. There are a few reasons for this as I understand it. Most of the weight is at the back of the car so the rear springs can sag in time. The front spring is much stiffer and carries less weight so that seems to sag less. So after 40 odd years it’s no surprise that the car might not be sitting well.
The trouble is that even the original factory shots show the cars at different heights front and rear. So it is difficult to know exactly what is correct. Nowhere can I find the correct height marked. I can find all the other dimensions but not this one.
That said, there are some things to go on. There is the chrome strip under the doors. This should (by my reckoning) be parallel to the road surface. Tyre size has a huge bearing on the way the car looks too. Some people fit 185 section tyres to 5.5” rims but this looks way too much to my eyes although it would help reduce the final gearing a little.
The original rims are 4.5” wide and the car would have been fitted with 155/13 tyres when it was new (I believe). Primo wears 5.5” rims and 165/65 13 tyres which are perfectly well suited to the car and rims. For some reason, probably steering, the front track is narrower than the rear and the front wheels are well inside the arches. It looks a bit strange so many owners fit spacers to the front wheels. This helps the look of the car but is bound to upset the scrub radius and can also reduce spring rate.
The further you bring the centre of the tyre tread away from the axis of the stub axle, the more you will upset the way the steering feels. The extra track width will make the car feel more planted and ultimately faster of course. From what I can understand some cars will be more effected than others in this respect. I must say that even with wider rims and 20mm spacers on the front I can’t notice any issue with the steering, even in very tight corners where the effect of a changed scrub radius would be most noticed.
Not many owners fit 14” rims and low profile tyres because it just doesn’t look right. It is amazing just how hard it is to get all this right. There is not much point fitting much wider tyres and wheels as there would be too much grip and the suspension, although clever for its day wouldn’t be up to it. Skinnier tyres allow the car to drift and stay on the road. It’s the way the car was meant to be driven back then.
The main problem with the 850 sport, or indeed all rear engine Fiats is that they have a rear swing arm which changes camber as it rises and falls. The lower the car the more the rear wheels go to negative camber but when the car is in a corner and the inside rear wheel drops down, the camber becomes noticeably positive and in extreme situations can cause the car to roll. Some racers fit a leather strap which stops the rear arms from swinging all the way down.

This is with the new lower Abarth rear springs fitted. Just a bit too low. Look how close the engine sump is to the ground. Note also the slightly excessive negative camber. If the front wheel also had negative camber it might look ok but that is a big difference and to my eyes just doesn’t look right. In anycase I must be able to drive over speed bumps without bashing the sump!

This is with the original rear spring fitted. Much less negative camber and slightly more clearance under the car.
The front end is a clever combination of intelligent thinking and old school technology. There is a leaf spring fitted across the car making a crude but effective independent front end. However this can be improved by the fitting of A arms in place of the spring and a set of coil over shocks. Many racers do this but I do not know how much it helps the handling of the car. Kits are available for less than £800.

Here’s the alloy version of the coil over conversion available from BerniMotori.
When it comes to getting the stance and ride height correct there are many options. But before I discuss any of that I want to talk about the correct way to set up the existing suspension way before any decisions are made about changing ride height.
All the suspension components use rubber bushings for their moving parts. These wear and need replacing. The parts are cheap and available but the fitting requires stripping down the suspension. That said the Fiat is one of the easiest cars to take apart so this isn’t really a big deal. So before any work is done on the ride, replace all the rubber bushings in the A arms, springs, swing arms and roll bars.
This is the most important. Do not tighten any of the nuts until the car is sitting with its weight on it . If you don’t do this the bushes will be stressed and stiff leading to an uncomfortable ride and fast wearing bushes. Also it may well have an effect on the ride height. You can alternatively jack up a wheel and force it into the normal position and tighten it that way. But this is very important and I get the impression from the cars that I have seen that this simple advice is often ignored.
I fitted some special nylon bushes for the top A arms on the front suspension which I bought from Berni Motori a Fiat racing specialist. And these are very quiet and smooth with less play than the original bushings.

The very cool teflon bushings for the A arms.
Next up in an effort to lower the front end I replaced the original old and sagged spring with an Abarth version with the ‘eyes’ inverted. This effectively lowers the car by about 25mm but in fact the original spring must have been pretty sagged as it still looks the same to me!
I wanted to lower the rear slightly as well but here the choices are limited. You can buy new harder and lowered (25mm) springs but they dropped the car way too much and were no stiffer than the originals. One of the things that happens at the rear when you fit shorter springs is that the negative camber becomes more noticeable. And too much camber just doesn’t look right either. In any case I couldn’t leave it like this as I was hitting a speed bump with the sump with just me in the car. It would never do. So I refitted the original springs.
The front still needs to come down. Here’s how I could do it. One of the most popular ways to lower the front end is to weld ‘ears’ onto the bottom of the stub axles and redrill the mounting holes lower and slightly inboard to increase track and camber. The camber can then be adjusted by adding shims behind the A arm mounting.
Berni Motori do a very cool lowering kit which works the same as welding ears on but also incorporates a simple way to adjust the camber. The problem with all the other lowering kits is that not one of them allows for any camber adjustment. You can add shims to make the camber positive but once they are all removed there is no way to go any further. So the camber adjustment is welcome. However these blocks lower the car by nearly 4 cm which is a lot. Plus they cost about £300 a pair so it’s not a cheap option either.

This is the very smart lowering/camber kit from Berni Motori.
If none of this appeals, you can always replace the spring mounting cross member plate which is simply bolted to the chassis with 4 nuts. The original one is made of thin steel but gets its strength from having a triangular shape. By replacing this with a straight U section of steel (or alloy) you can lower the spring by about 35mm. The two down sides to this being there is still no camber adjustment and you need to cut off (or bend) a part of the chassis out of the way or the spring will clobber it.

A popular way to lower the front end is to replace the spring mounting crossmember with a U shaped piece with no rise in it. The spring shown is a standard version. The Abarth front spring has the ‘eye’s on the top of the spring.
So my issue is just how much more to lower the front end. Because where I live is infested with speed bumps there is no point lowering the car too much. All that will do is compromise comfort. Since the rear of the car cannot be lowered gradually (well it could by making up spacers etc but it wouldn’t be easy) and I only have a choice of standard or way too low I will stick with the standard and match the front end to it. By my reckoning I only need to lower the front end about 25mm to make it look about right.
So the easiest and the cheapest is to change the cross bar mounting plate for the front spring for a straight version and lower the front another 35mm and see how I get on. If that is too low it is always possible to add shims under it and raise it up slightly. There are a lot of different ways to lower this car so at least there is hope. It will just take a lot of messing about to get it just right without losing the comfort and the suppleness of the existing suspension.
What no one will tell you is that as soon as you mess with the spring height you also have to mess with the upper A arm. It also needs raising or the camber will change will be irregular as the wheel goes over bumps. One down side of all these height changes without lifting the A arm pivot is that even with all the shims removed there is still positive camber on the front wheels.
It is essential that the upper A arm is also raised in order to reduce this positive camber and to reintroduce some negative camber. At least when there is negative camber, it can be dialled out by adding shims behind the A arm pivot.
Update Nov 18
Just for fun I tried and experiment with the cooling. It seemed to me that the system the PO had installed could be improved but what with all the other pressing things to do it was far down on the list especially as the car was quite drivable so long as you didn’t come up against too many hills or drove it hard too long.
I simply reversed the fan assembly which slotted into the cowl nicely after I filed the three motor support legs down a bit. Even the original mounting holes realigned nicely. The only problem was that there was now a gap between the fan cowl and the radiator cowl. I wrapped the space with a piece of PVC fabric and tied it in place with string. Crude but effective.
Then I refitted the plate that goes under the engine. I have heard that this piece is essential if you want your 850 not to overheat. It couldn’t easily be fitted as the electric water pump (EWP) was too low. So I added a bit of pipe which incidentally had a water temp switch already installed and lifted the pump up enough to allow the plate to be fitted.
I wired the water temp switch to the fan so that it would only come on when the water was up to temp. Then I went for a drive with the heater off. Having the heater on makes a big difference to the way the 850 cools so turning it off was a sure way to know if there was any improvement.
The temp gauge needle barely got off the mark and when I put the heater on it fell even further. The engine is cooled so well that there was very little heat coming out of the heater. So this is a bit of a surprise. I had not expected such a dramatic difference especially with the small electric fan, apparently from an Abarth A112 but that has a radiator at the front and is not so reliant on the fan.
So for now at least I have decided to keep the current system. There are lots of up sides. It’s already installed and does not rob HP as the original system does. I have ordered the EWP controller and a quality electric fan which I will fit properly to the radiator cowl without the need for bodges. The controller operates the EWP and the fan. You can set the desired temperature and the controller will keep it there. In theory.
It seems quite a clever system so long as it doesn’t go wrong and this is the biggest downside to me. At least with a well maintained mechanical fan/pump system you know where you are. An electrical system can go tits up at any moment. The other advantage is that the controller will continue to operate the fan and the EWP for a few minutes after switching off. The helps to let the engine cool down more gradually.
Next on the list is Waterless coolant…
Update 18/12/14
The controller duly arrived and was wired up. The fan is supposed to come on at 3 degrees above the set temp. Trouble is without the fan running the whole time the engine quickly overheats, vents some steam, the level of coolant drops and finally there is so little water in the system that the EWP runs dry and can’t re prime. Not helpful.
I’ve written to Craig Davies to see if there is anything they can do but in the mean time I have wired the fan to run full time and since then have had no problems. So basically I have a controller that lets the EWP run for a while when I turn the engine off and nothing else. Bit of a waste of time really.
Distributors. On the 850, the distributor is a simple thing with a mechanical advance. It doesn’t have a bearing as such only a bronze bush that the shaft runs in. Once there is play there the points gap can never be precise and the engine performance will suffer. Many folk fit an electronic version which was fitted to the later A112 engines but it is very hard to find or expensive and in any case still uses the original bush which is prone to wear and cannot be repaired.
It would be nice if there was an aftermarket electronic distributor as a direct replacement but there is not. Or rather there is but it’s complicated and expensive. There is a company in Holland, 123ignition.nl who make a very clever distributor which has all the electronics in it so that you can still use your existing coil and leads etc.

It has many clever features and can even be tuned using a PC. The problem is they do not make one for the 850 which is strange when you consider how many there are out there. I did write to the company who said they would look into it but didn’t promise anything.
Then by chance I discovered these people who can take your current distributor, rebuild it, new bush etc and fit the 123 distributor parts into it. For a price that is!
http://www.123ignition-conversions.com/
It is also probably possible to take a 123 Tune and have it machined, add on the shaft at the right length and make it work. It depends on what skill and tools you have at your disposal. What is certain, a good accurate spark is essential for a smooth running engine.
One very clever feature of the 123 is that it has spark balancing. This is a F1 technology that can somehow recognise a different need in every cylinder and advance or retard the spark at that cylinder when needed. The 850 engine with its shared inlet manifold may benefit greatly from this new technology.
Update Dec 2014
Bought a second hand distributor for £30 and have put that on the car for now while I send the original to have its innards changed for the 123.
Bought a lowering block. This is the piece which replaces the crossmember and drops the front end about 35mm. Like most things, once you start messing all sorts of other issues become apparent. It came from GKR who sell these on Ebay. It’s simply a folded piece of alloy sheet with some holes drilled in it. With it came instructions but they are a bit vague and make no mention of having to lift the upper A arm.
For fun and as a way of learning more about the physics involved I decided to fit the lowering block even though I do not yet have a solution for raising the A arm. I didn’t want to lower 35mm, only about 20mm so I made up some packers to be fitted under the crossmember and also the spring.

Lowered at the front a further 20mm or so, Primo now has a nice well balanced stance
The stance is now excellent. Lowering the front has certainly also raised the rear but it looks well balanced like that. The problem is that the A arm and the spring no longer move in a similar arc as the spring has effectively moved up but the pivot point of the A arm has not. This leads to positive camber on the front wheels and a lot of bump steer. The steering also feels tight and harder to turn. It also has a tendency to wander off if you’re not holding the wheel tightly. Clearly this will have to be improved on as the car is not nice to drive like that.
Naturally there are a couple of solutions. One is a simple and inexpensive trunion adjuster kit for about £70 which comprises of 4 turned risers which are bolted on to the existing bolts and the A arm is then bolted to these. In theory it will return the front end geometry to normal but it does not add any camber. It would be nice, if only for the look to have a very slight negative camber and because I have not lowered the front end the full 35mm there is a chance that I will achieve this.

Or Berni Motori offer a stepped A arm mounting bar which does the same thing. I suspect that this is the better engineered solution. Although it would mean stripping the A arm to fit whereas the adjuster bolts are simply fitted.

Update Jan 24
The trunion adjusters were duly ordered. They are not listed for fitting to an 850, only a 600 but as the A arms are the same dimensions it should be fine. Not so. The 850 A arm has a reinforcing bar welded across it and this fouls the trunion adjusters! If the A arm is fitted upside down they work but then the shock absorber fouls on it. So either hack away a lot of metal to make them work or order the cast pivot arm from Berni. Hacking away metal is not an option so I have ordered a pair. What I hope will happen when these are fitted is that I will have lowered the front end and re-aligned the suspension geometry so it all goes up and down in unison as Fiat intended and to get a little negative camber in to the bargain. Then the car can go and get the entire geometry set and I am hoping that will make a big difference to how it steers, feels and rides.

Primo today with standard rear springs. A reverse leaf front Abarth spring, GKR lower cross member (with 24 mm of shims added). Upper A arm as standard. Very slight positive camber on the front wheels. But the ride height is good and the car has a great stance. Just the upper A arms to raise now for perfection.
Distributors and door cards

The 123 conversion fitted into the original distributor. Shame about the gaping hole for water to get in. This was just one of many issues.
A bit of a mixed week. The 123 distributor arrived. I sent off the original one for modification because 123 don’t sell a model for the 850 so the only choice was to either buy one of their distributors and modify it or get mine converted. I’m sure it’s not the hardest thing to do but as I don’t have the equipment I figured it was best left to someone who did. Enter 123 conversions. A Dutch company who can fit the 123 system into your original distributor. The obvious advantage to this is an engine that looks standard but isn’t. I guess the downside is that your original distributor will be ruined by the process.
Fitting the new distributor was not the simple swap I had hoped it would be. For starters I could not get the distributor into the hole in the engine! It turns out that the new roll pin was far too long. So I ground that down. The washer they had also fitted stopped it going in so that was removed. There is always an up/down play in every Fiat dizzy I have seen. This all took time but eventually I got it fitted and rotating as it should.
Wiring is simple. One black wire to the neg side of the coil and one red wire to the positive side. And a blue one to the earth of the car. The red wire is left off until the static timing is done. This is done by rotating the dizzy until a green light comes on. (engine at TDC). I tried to start the engine but there was no life. I tried rotating the dizzy a bit either way but nothing. I pulled a plug and sure enough. No spark. Very disappointing.
On closer inspection I decided I wasn’t very happy about the way the conversion had been done. Where the wires exit the dizzy there was no grommet so that water could easily get in. The hole that had to be made in the top plate of the 123 was ugly and ragged and in time might well chomp through the wire’s insulation. Worse than this was the fact that the wires pass perilously close to the spinning alloy rotor on top. With nothing to hold them away the chances of these getting chomped was great as well.

Don’t know why they brought the wires out the top when they could take them out the body below.
All in all I would have to say that for the 600 odd Euros that I paid I am rather disappointed. It seems to me that it would just make more sense to make another hole in the body of the dizzy under the 123 mechanism and feed the wires out through there. Much easier to fit a grommet and water can’t track up hill either. The dizzy has been returned with a suggestion that they do the wires like this rather than the strange way they did it. Hopefully I will have better news to impart when I get it back.

New leather door cards. Apart from looking great they have massively improved the feel of the car. It is quieter and has less strange noises. The doors shut with a superb ‘clunk’ quite unexpected from an old Fiat.
My other half has been busy making the door cards for Primo. I spent a whole day fitting them and they look marvellous. It’s all a bit black and dull at the moment but once those nasty black plastic door trims are replaced with varnished teak they will look fabulous.
The interior of the 850 sport is great and one of the car’s best features. I suppose all that vinyl looked ok when it was new but leather looks nicer. It’s a huge amount of work to make these things in any material so why not spend that little bit more and have a really splendid interior with the evocative smell of leather. From an environmental point of view there is also an argument for using it as leather is a sustainable product whereas vinyl is not. In any case it’s a natural and very beautiful product.
We copied the basic shapes and proportions of the original design as those Fiat designers knew what they were doing. The Italians are excellent at proportion and style. Originally the door cards had chrome trim on them but this is hard to replicate so the decision was made to have piping instead of chrome. I imagine they put the chrome there to offset the nasty black plastic door trims.
The map pocket is now poppered in in two places instead of being attached only in the centre. I doubt I’ll use these pockets for much for fear of stretching them out of shape but they are needed to balance out the look of the panel.
With the door cards in place it is a different car. The difference is amazing. It is quieter and feels more solid and rattles less over bumps. All this from simply changing a door card. Well, I did add sound deadening to the inside of the door. I also replaced and greased the winder mechanisms and replaced all the glass channels. The door cards were the final touch. All these little things together have made a huge difference.

New rear cards too. Will look a lot better when those nasty black plastic trims are replaced with real wood.
The biggest surprise and the biggest pleasure is the sound of the doors when you open or close them. I do not think I have ever heard a Fiat with doors like that. The sound is quite striking. Maybe striking is not the right word. Perhaps lovely is. They sound great. They even close better. With nothing loose to rebound all that mass just shuts. Sweet.
Next up are the back seats. The foam was all pretty shot so the seats needed rebuilding with new foam before we could even think of covering them. Although not many people will ever sit on them they need to be done nicely to match the door cards. Of course the door cards and seats are just the beginning. There’s still the head lining to replace but that will have to wait until I’m prepared to remove the glass front and rear but before I can do that I’ll need new rubbers….

Mar 2015
Back seats are made and installed. Looks fantastic. All the foam was replaced on the back part and much of the lower seat too. Wheel arch covers are made, they just need sticking on.

New door cards and back seat in leather. Now the car has a much better smell than before.

The distributor.
It finally came back with the cap smashed because of poor packaging. The way the wires come out is better but frankly for the money they charge it’s not great. Hopefully it will at least work this time. I’ll try and fit it this weekend.
The brakes.
It should have been an easy task. Order new shoes, discs, pads etc and replace all the brakes. The rear was easy enough and now they work much better. The handbrake is excellent.
The front end was another story. Obviously after 46 years a car gets changed about a bit. This much was obvious as soon as I tried to fit the front discs. They didn’t fit at all. The right discs had been ordered but it seems that someone changed the front spindles and hubs to a series one which means only series one discs will work. Sigh.
Series one discs are as rare as rocking horse shit and consequently much more expensive than the series two which you can buy anywhere for about £20 a disc which is cheap. The only discs I found were in Italy and were nearly £300 the pair! The alternative would be to swap out the spindles and hubs with a set of series two ones and fit the series two discs but that is a lot of work and it is almost as hard finding these things as a series one disc is.
A second hand set of front hub/spindles would be the answer but then they would need rebuilding so what with one thing or another the price would rise and suddenly £300 doesn’t seem so bad. It is what it is. Sometimes with old cars one gets a surprise. At least the car will have all new brakes and since I hardly ever use the brakes anyway, they should last 50,000 miles or so. I’ll keep my eyes open for some series two hubs for when/if the series one discs need replacing in the future.
Front suspension.
The drop arms arrived from Berni Motori in Italy. They basically lift the pivot point of the upper A arm to reset the suspension geometry back to normal after the front end has been lowered.
On the plus side the car now drives and steers much better. You can take your hands off the wheel even over bumps and the wheel remains inert. The car seems eager to go around the bends and at speed the steering is lighter. I have not yet set the tracking so I’m hoping that after this is done the car will be set up as well as it can be.
As for camber, I have not managed to get as much change as I had hoped. The raised A arm has helped the way the car drives and steers but there is still not enough negative camber. The wheels rarely look the same one minute from the next for some reason that I have not yet understood and the camber seems to change depending on where the car is parked. Very odd.
Until I get the car’s geometry checked I cannot be sure of the camber but I’d say it was almost neutral or perhaps slightly positive. In any case I’d like to add a bit more negative camber, mostly for the look. With all that negative camber on the rear it just looks wrong having any positive camber on the front. I know I am nit picking but one instinctively knows when something is right and it isn’t quite right. At least as far as my eyes are telling me.
Fitting the drop arms was not straightforward. Basically all the dimensions are the same and so in theory at least if it can be fitted it can work but in order to even fit the drop arms to the A arm, the reinforcing bar that joins the two parts of the A arm must be unwelded from one side to allow the A arm to be split.

Here’s the new drop arm fitted to the upper a arm. In order to fit it required the splitting of the A arm. Then some grinding away of material in the reinforcing bar that joins the two sides.
That in itself was not a big deal. The welds now replaced with temporary bolts until I get it welded back up. But even with the A arm fitted to the new drop arms, there is no way that the arm can move as it fouls the mounting at the bottom. This is made worse by the fact that the bolts that the drop arm mounts to make this fouling even worse. The only solution is to grind away a small part of the reinforcing bar. It’s not ideal but it works.
The car feels better going over pot holes and speed bumps. The suspension is quiet and feels right. So, a lot of effort and some grinding but at the end of the day it was worth all the effort.
Now to adjust the camber on the front wheels. Basically I have run out of options here. Even with the shims removed from behind the drop arm there is no way to get any more negative camber. But I then discovered that it is possible to buy polyurethane bushings with eccentric camber adjusting crush tubes. So if ones could be found that fitted then maybe a degree or so of extra camber could be fed in.
I wrote to SuperPro who, it seems to me, make the best bushings in the business but they said they couldn’t help me. Or didn’t want to. But I can’t believe that there isn’t a bushing in their immense catalogue that couldn’t be easily modified to fit. If that fails then it could be possible to make my own using a special pouring mix and a mould. Fun and games. But isn’t this why we love tinkering on cars?
Update March 22
Series one discs NOS arrived from Italy and were duly fitted along with new front wheel bearings. There is hardly any brake pedal travel now. The old discs were worn unevenly and were down to about 7 mm in places. They are supposed to be replaced when the wear is down to 9mm! No doubt this has been an issue with this car for a very long time.
The 123 Distributor is in and working. This time I wired it up and it worked straight away. I don’t know why the other one didn’t. Anyway, all’s well that ends well.
The 123 Tune distributor conversion has two curves as standard. I have decided to try the first curve as it is to see what’s what and then to play with the advance curve bit by bit to try and maximize the performance and smoothness.
Even on the standard curve it is immediately apparent that it has a steadier and smoother spark. The tickover is very smooth and even with a cold engine, the choke can now be pushed in almost straight after starting and the car will still pull cleanly away.
The midrange is improved and there is much less jerkiness when coming off and on the throttle. The top end seems a little lacking but this is something I hope to work on. The 123 was set at 6000 to limit the revs. In fact the rev counter shows 5,500 revs when the limiter cuts in. So when on rare occations I have revved to 7000 plus on the dial, I have in fact being revving even higher than that! That A112 Abarth engine is tough.
In order to set the limiter and modify the curve you need to connect the 123 to a laptop and run the 123 program. It’s very simple. So I set the rev limiter to 8000 (the max revs the distributor can provide) and also added two degrees of advance about 3000 rpm. A quick test shows, clean and eager acceleration, a crisp engine note and the gear lever is vibrating less so all in all I would say it’s all good. But of course the best bit is that once the correct settings are found you never have to touch it again. No points to wear out, no bob weights or springs to get saggy.
I’ll update more on this 123 distributor later as I test it over time
Update March 24
After a few days of use I can report that the 123 distributor has made a huge difference. It is very impressive. I didn’t think I would have noticed such a change but it was immediately apparent right from the start. I have set the timing at 10 degrees (set with the strobe) but I think this figure could be advanced a little.
The car starts as well as it ever did but the difference now is that the choke can be pushed almost all the way in within moments of starting and yet one can still easily pull away without the engine stalling.
On the move, the engine pulls cleanly and the exhaust note sounds more even and perhaps even a little sharper. There is certainly more mid range but the top end does not feel as strong.
This is all easily dealt with as I can adjust the advance curve bit by bit until I get it right. The one thing I did do was change the default rev limiter from 6000 rpm to 8000. According to my tacho, the limiter would cut in at 5500 rpm suggesting a 10% error. Not bad. I thought it might be worse than that. What it does mean however is that on the rare occasions I have revved the engine to 7000 plus on the tacho, it has actually been spinning even higher than that!
When I timed the engine with the strobe, one thing was immediately apparent and that was that the timing marks were not hopping about all over the place as they usually do but rather holding very steady.
So, a definite improvement. Only time will tell if it is reliable. In theory, once I get it set correctly it will not need touching again.
Update April 15
Finally I got the suspension as sorted as I could and went to get the tracking done front and rear. The young bloke ordered to work on my car was clearly in a bad mood and did not like the idea of having to work on an old car. He was muttering about seized bolts and other nonsense. I told him all he needed was a 13 and a 17 mm spanner and he could practically dismantle the car but he remained unconvinced. Weird really since my experience is that modern cars are far from easy to work on and often require specialist tools. The Fiat 850 must be one of the easiest cars in the world to work on.
So he hung the lasers or whatever they are on the wheels and proclaimed that the rear right side was toeing in too much but couldn’t be adjusted. I explained that all he had to do was loosen three bolts at the front of the swing arm to do it. He grumbled some more but I think was surprised when the swing arm moved and was easily adjusted.
I was not expecting any hassle from the front end as all the track rod ends and links were new. The tracking was out. It should be set about one degree toe in but it was not even 30 seconds toe in. Maybe this would explain the heavy steering and wayward nature of the car at speed. It should have been a simple matter of loosening the clamps on the track rod end and rotating it to bring the wheels in. But the necessary adjustment couldn’t be made because the rod would bottom out in the tube. Most odd.
So that was that. Today I unscrewed the tubes and ground off 5mm from the link arm and 10mm from the end of the track rod. It needed all of that to get the threads to go far enough. I don’t know why this needed to be done. Is it possible that the parts I bought are not made very accurately? Do they leave them long so they fit more than one car? Maybe it has something to do with the fact that I have lowered the front suspension. If that is the case then this suspension lowering business is even more complicated than I thought. And I already thought it was complicated!
Before I took the car apart I measured the distance between the link end and the track rod on each side. When I put it back together I removed one mm from each side. I don’t know until I get the tracking redone if I have achieved the right amount of toe in but it must surely have helped.
On the road the difference is really quite dramatic. The steering has regained its light touch. The suspension is unfazed when going over bumps and the ride is excellent. Finally I have managed to get the car working like it did before I lowered the front end. It has been quite a journey. It will interesting to see how close I got the tracking and if I didn’t get it right then the car may yet improve further.
It’s been almost a year since I bought Primo and he is a very different car to the one I bought. There was a lot right with him but also a lot wrong and it has taken me a long time sorting out all the issues one by one. One forgets that the windows used to lower themselves as you drove, the rattling brakes, the clunking shocks, the uneven brakes and the doors which rarely closed first time unless you slammed them shut.
Since then all these faults have been dealt with and the car has been improved in almost all areas. The silent coat sound deadening along with the new door cards has turned Primo into an almost civilized car. If it wasn’t for the fact that at 70mph it is turning over 5000 rpm it would be a great all round car. The gearing needs to be addressed. At some point I’ll have the engine and box out and put a 9 x 35 final drive in there. That should help.
The 123 electronic ignition is also a very sweet thing. The hassle I had with the conversion now just a distant memory. The engine runs so smooth it is really amazing. At 4000 revs it is like a well oiled sewing machine.
In order to set the advance and timing on the car, I plugged in my laptop and went for a drive. I used curve 1 which was pre installed and bit by bit tried adjusting various things. On the 123 there is a tuning option which basically allows you to advance or retard the timing by as much as 5 degrees as the car is running. I tried this but it didn’t make much difference either way.
There is also a rev timer. You set the rev range you want, say 3000 to 5000 then you drive the car in a chosen gear and rev through the range. The time it takes is recorded so that when you adjust the timing and try again you can instantly see if there is an improvement in time. I played with this a bit but you’d need a lot of time and it would be really helpful to have a mate in the passenger side who could adjust the 123 while I concentrate on driving.
After a lot of messing about I came to the conclusion that the original curve works the best. I have since found the advance curve for the A112 engine so I will compare it to curve 1. I suspect it is very similar. It’s hard to imagine that the car could run much better. The only thing I have not checked is the cam timing and I’ll do that when the engine is out.
There’s still much more to do but mechanically Primo is very nice and although it’s nearly 50 years old does not feel so old to me. It may not have the precision that modern cars have but I for one like drifting around corners, it’s way more satisfying.

Primo today. Great stance. To me, this is how the 850 sport coupe should look.
Update April 2015
While I was under the car I noticed that the GKR alloy crossmember lowering block was slightly bent. Not good. I wrote to the guy who sells them. He seemed to think that is is because the nuts are not tight enough but I’m not convinced. Probably has more to do with the 20 speed bumps I have to negotiate just to get out onto the road. Either way, it is a nuisance. Perhaps a steel one would have made more sense. Maybe a bent piece of metal is no match for the triangulated box section original. That’s nearly 50 years old and is not bent.
Oh the joys of modding.
Update June 2015
Just got back from a delightful holiday with Primo. We travelled over 500 kms through France, up hills and down hills, fast corners, hairpin corners and he behaved perfectly. In fact I would go so far as to say that the car is comfortable, reliable AND economical. And of course, everywhere we go people love the car. From old biddies to young kids, there’s something about the Fiat 850 coupé that makes people smile. It takes them back to a simpler time. Nostalgia is in and the 850 Coupé is the epitome of this. Maybe it’s the chrome, maybe it’s the bark from the exhaust. Who knows? What I do know is that I am happy to drive it for hours at a time and I get out feeling fresh. Just keep off the motorways! So long as you stay on the back roads Primo is the perfect car.
Now that it is summer time I will take him off the road to do some work on the engine and gearbox. The diff whines a little and I would like to fit the alloy sump, among other things. I have considered changing the final drive but since the 123 distributor has been fitted the engine is happy revving its nuts off so I think for now I will live with it like that. Maybe I’ll look out for another gearbox and modify that so I can quickly change them over if I feel like it.
Also I really must get around to refitting the original fan system. The electric fan just doesn’t do the job. So long as one doesn’t drive at more than 90 kph for any length of time and can coast for a while the engine doesn’t overheat but that’s no way to have a car. It’s useable but I’d prefer a car that can be thrashed all the time if needs be.
Update Aug 2015

One of Primo’s front seats now recovered in black leather. Beautifully done in the same style but with slightly bolder piping. Really splendid and more comfy too with extra padding in the Lumbar area.
The front seats are now recovered in black leather. What a difference that makes. While the seats were apart I noticed that many of the spot welds were broken at the base of the back part of the seat. This is why the back part seemed to twist when getting in or out of the car. This was solved by adding a load of rivets.
The original foam really wasn’t too bad considering its age. A steaming of the foam rejuvenated it to some degree and a bit of extra thin foam was added here and there to even things out a little. One thing the original seats lacked was lumbar support so some extra foam was added so hopefully this will improve the comfort when driving long distance.

I always loved the way the 850 sport front seats folded down. With that funky central release button.
Next up is some carpet. Then, apart from the headlining the interior will be more or less finished. I might cover the dash in real leather as there is plenty left over. The vinyl fake leather I fitted looks OK but somehow it looks cheap against the real leather of the seats and door cards.
Also thinking about a folding sunroof. This costs about 1000€ and that is just for the kit. I’d have to fit it myself as I don’t know anyone here who could do it. You don’t just trust anyone cutting out a massive hole in a car’s roof! Obviously I am conflicted about the idea of making a huge hole and spoiling the car’s originality but at the same time the Tudor Webasto is a period item, a luxury extra that was often fitted to cars of the highest calibre. From a pleasure point of view there’s nothing like driving in the summer with the sky visible above you.

Chrome polished, metal painted and all new leather covers. Really sweet. And comfy too.
Next up: Put the original water pump back in and revert to the original cooling system. Engine and gearbox out to do a few things, change a few bearings and fine tune a few things….
Update August 2015

Finally Primo’s A112 Abarth engine is cooling like it should be. The original mechanical pump and fan is reinstalled. I know why the previous owner didn’t get this far. That is because it was a very hard and long winded job!
Well now I know why the previous owner of Primo never put the 850 cooling system on the A112 engine he installed! What a job that was. Unfortunately the PO chucked out all the fan assembly so I had to order a second hand one online. That turned out to have a few issues. I think it must have been from a saloon or something because it didn’t fit the new 850 pump I had so brackets had to be made up or modified.
Also the alloy cam bracket that fits to the pump shaft and holds the yellow fan was broken in two. Most unhelpful. So that had to be welded up and filed down as things like this just can’t be bought new any more.
The biggest job was converting the 850 pump to fit the A112 engine. Not only does the pump have to be cut in half and adjusted but the mounting piece needs to be filled in because the pump is a square four bolt mount but the block on the A112 is a three bolt triangular affair.

The standard 850 pump assembly has to be cut in half and extended a bit to get the fan rubber to line up with the radiator cowling. Not the easiest job.
None of this is rocket science but it neither is it straightforward because not only does the pump have to be adjusted so that the bellows around the fan properly aligns with the radiator cowl but it also needs to be properly aligned for the fan belt. Get this wrong and the engine will probably eat fan belts, be noisy or just waste power. Suffice to say it took a while but in seems ok in the end.
Luckily one of the things the PO didn’t chuck out when he optimistically thought he could solve the cooling issues with an electric pump and fan was the double pulley for the alternator. Only that the shaft on my alternator was 17mm but the pulley I had was for a 15mm shaft. A quick trip to the local engineer soon sorted that out.
The water pump pulley didn’t line up perfectly with it so it had to be packed out using a washer behind it. I could have used some of the packing washers that are used to adjust the tension of the water pump belt but a washer was easier and it leaves a load of spare spacers for future belt adjustment. I don’t know why this belt wouldn’t line up perfectly but it was an easy fix.
I have heard that the 850 can overheat in traffic because as the engine is turning over very slowly, so does the fan. This means it doesn’t push much air through the radiator or pump much water. So I decided to fit the old 10” electric fan behind the radiator and connect it to a heat switch fitted into the lower radiator hose. So that if the engine should get very hot the extra fan will kick in and hopefully move enough extra air to cool it down.
It’s very neat because it is impossible to see it. In fact I must say the whole engine bay looks so much better and much more balanced now that the electric pump, fan and controller has gone. Electrics are all well and good but why have an analogue car if you put electronic parts in it that can fail. I know mechanical parts can fail but with careful maintenance this is very unlikely. With a new pump and belts, what is there to go wrong? Yes I know I have an electronic distributor but I still carry the original distributor with its points always in the car!
I also made an interesting discovery which I probably should have noticed earlier and had I wanted to keep the electronic cooling I might have done. But knowing I was going to change it all meant I never really investigated the system properly. When I drove the car hard, like going up a hill for example, the engine would heat and the radiator would blow water out. After a while the electric water pump would stop working. So once water was put back in and the pump primed all would be well.
It seemed to me that the car was overheating and that was why the water was being forced out of the radiator or that the cap was too weak. Not so. The cap was too short and was not even sealing the radiator! No wonder it pissed water out every time I went fast! Fiat 850s have a long reach (32mm) radiator cap. Now ordered.
When the car goes back together properly after the engine work I shall be installing waterless coolant which does not expand so I have removed the expansion bottle as it won’t be needed.
A test drive shows that those Fiat engineers knew what they were doing. The needle on the gauge never got above a quarter of the way across. I have never seen that in the whole time I have owned the car. I gave it a good thrashing but it seems that the harder you drive it, the more it cools. I tried leaving the engine ticking over for ages and eventually the needle did creep up slightly but showed no sign of overheating. It’s entirely possible that the extra fan just isn’t needed. All in a very satisfying day.
As for lack of power, well I didn’t notice any. Perhaps the revs climb a bit slower but the extra drag from the fan isn’t noticeable. I had heard that using an electric water pump can liberate 5 hp. I don’t think it’s that much. Very happy to get the cooling system back how it should be and very happy that it seems to cool so well.
Recently I learned that they might be a water pump solution for the A112 engine in a Fiat 850. It comes from Fiat Plus in the States. I am unclear on the exact details but it is a four bolt mounting so possibly needs a spacer between the block and the pump. But at over $300 that would work out very pricey for us in Europe as we’d have to pay import duty. But it’s worth knowing about.
Update Aug 2015

Newly covered leather front seats.
It’s been a busy month working on Primo. He gets better every day. Obviously the new seats have made a massive difference and have inspired me to finally make some carpets. I tried to buy some ready made as they would certainly fit better if they were moulded. But despite many companies listing the 850 coupé none of them actually had any carpets or failed to reply to my emails. No surprise there.
So I bought some rubber backed wool carpet. I bought two linear metres (roll width 1.54m) and it wasn’t quite enough so I have ordered another half a metre. I also bought some under felt to go under the carpet. I was quite impressed how well the carpet formed to the wheel wells without needing to cut it.

Rubber backed wool carpet installed. This will be trimmed in leather for easy removal and cleaning. There is felt soundproofing under the carpet too. Very thick and luxurious.
It looks really nice and the car is certainly quieter and smoother which is nice. There’s still a bit of work to do. I want to trim the main carpet sections with leather so that they can be easily removed for cleaning. I also need to sew in a heel mat on the driver’s side. Massive improvement though.

Wooden door trims in place. Only three coats of varnish in this pic. I’ll post another when they are finished with 8 coats of marine varnish.
Also finally got around to making wooden door trims to replace the nasty, cheap black plastic original ones. Because the door cards have been replaced in leather without the chrome trim it needs a contrast. Varnished teak will match the dash wood and brighten the somewhat sombre black interior. It will also add a level of quality never usually seen on a Fiat!

The front door trims are made from two pieces of teak glued together and then shaped and rounded. The ends have wood glued in give a finished look. The original black plastic door locking knobs are being reused. Three stainless screws hold the trim on as before. I had considered hiding the screws with wooden plugs but it would mean damaging the trims if (when) one day you needed access to the winding mechanisms.
The rear trims were a bit more difficult as they are made from only one piece and they twist and bend as they follow the car’s shape. Fortunately the wood is so thin that it bends without too much difficulty. These will both get 8 coats of Epifanes yacht varnish so they will look very posh.
Once the last coat of varnish is done I have some lovely stainless strips with velvet finish to put on the front wood trims against the glass. With new window channels and winders and finally this trim the windows will go up and down very smoothly and without any rattling!
Rear Wheel Bearings
I finally managed to get the rear wheel bearings after a bit of a mission. Not everyone sells them and those that do are asking silly money for them. I managed to find one for £10 and another for £40 that’s just the two exterior bearings. The inner bearings and the seals are easy to get hold of and inexpensive.
From what I had read changing the rear bearings looked like being a right mission. In order to get the stub axle out a slide hammer is needed which I don’t have. I decided to see what I could do without one. As it turns out it wasn’t the fight I had anticipated. With the driveshaft unbolted from the flexible coupling there is access to the nut that holds the flexible coupling to the stub axle.
What did surprise me was how tight this nut was though. The only way I could undo it in the end was to put a tube on the ratchet handle and lower the weight of the car onto it! That was tight. Nut removed it was easy enough to get the stub axle out with a good thump on the nut end. Obviously the brake drum had to be removed as did the shoes, then the bearing carrier could be taken apart and the bearings replaced.
Once all packed with grease and reassembled there is a small amount of play in the wheel. However there is no adjustment to get rid of this so I can only assume that once the bearing is hot it expands and the play goes away. That or the play remains. I really don’t know.
Front Wheel Geometry
Also this month I decided to have a go at getting some negative camber on the front wheels. Despite raising the upper A arms the front wheels still seem neutrally cambered, if not slightly positive. There are no shims behind the A arm so there wasn’t much I could do. I ground down a bit of the A arm support and moved it inboard by a couple of millimetres. It has made a slight difference visually but the car seems to steer much better. It might be my imagination but often when things look right, they actually are!
Another small job I did that has been a great success was to make the gear lever shift with less movement. As there is no short shifter kit available I was forced (as usual) to come up with something myself. Here’s how I did it. First I removed the gear lever assembly completely and disassembled it.
Short shifter
There is a plastic ball moulded to the bottom of the shaft. I didn’t really want to try and remove it but as I had to cut and add a piece to the shaft just below it I knew that it wouldn’t be able to take the heat of the welding so I had to get it off. I used a wood chisel and was lucky that it simply chose to split in two, quite neatly as it turned out. I would refit it later.
With the ball off I simply cut the bottom eye off and extended the shaft by about 12 mm and then welded it all back up again. The plastic ball was repositioned back in the same place. I drilled a 5mm hole right through the ball and the shaft and fitted a countersunk M5 bolt. I sunk the nut in the other side and ground it down so it was all smooth. This holds the ball in place so it can’t fall apart or move. Result. Crude but effective.
The gear change lever assembly needed to be lifted by a nut’s height so that there was clearance when going into reverse as the lever is pushed down. Other than that it was a great success. The lever is now much shorter and precise to shift. Much better. I also fitted a spring (which I assume should have been there but was missing) to keep the lever from buzzing.
Triger cam belt conversion
One failed project was the fitting of the Triger cam belt conversion. It all looked so hopeful at first. It’s a very clever kit with everything you need but for some reason the lower pulley is too long as if the crank I have has a shoulder that comes out too far. What this means is that the lower pulley can’t be pressed in far enough, one: to get a good surface on the oil seal and two: to get the lower crank pulley on in the right place so it lines up with the alternator. Hmm. I’ll have to write to the Italian company who sold me the kit. It says it is for the Fiat 127 and the A112 so it should fit. More on this later.

This pic shows the shoulder on the crank which is stopping the bottom belt pulley from going on far enough to allow the crank pulley to align with the alternator.

This is the lower belt pulley. It’s too long. It may have to be cut down but there won’t be much surface for the oil seal. When the engine comes out I’ll be able to tell better what can be done.
Next up. Engine and box out. New clutch and stuff like that.
Ordered a Aisin AMR 500 supercharger but the Ebay seller wasn’t honest with his listing so something I thought was coming from Italy was actually coming from China! With duty and taxes to pay. Suffice to say, it was returned tax unpaid and the Ebay seller is dealing with it. Hopefully it should be delivered soon then I shall look into how it can be fitted. Watch this space…
Update August 2015
Supercharger arrived. It looks very good. Not too big and not too heavy. I placed it on the engine today just to get an idea and it all looks like it’s quite doable at first glance.

This is the actual blower. Fully reconditioned.
The new blower came ready fitted with an 85mm dia pulley. This works out well. If I add another 125mm crank pulley to the existing one to drive the blower, that should give me a 1.5-1 ratio which will over run the blower somewhat. The blower has a max rev limit of 16,000 rpm so even if I rev the engine to 8000 rpm the blower should be fine.
The engine has a 1050cc capacity so with that ratio I can expect about 9psi or 0.6 bar. I am hoping that this isn’t too much. I don’t plan on reducing the compression ratio unless I have to but I can always lower the boost by using a larger pulley on the blower. We’ll just have to see. If worse comes to worse I can always use a thicker head gasket or machine the pistons.

Here’s the blower resting in roughly the final place although it does need flipping 180 degrees because as it is there it sucks, not blows.
The blower has plastic threaded manifolds bolted on. I don’t know how they will work in the real world. I may have to make something more substantial up in aluminium. Again, we’ll have to wait and see.
There are many issues with a Supercharger installation. The blower needs to be driven and that means it needs to be lined up with the crank pulley. That fixes the position on the engine. Mounting the blower is the next issue. It has a few threaded holes in the casting at each end. I guess the strongest and easiest place to mount it is to use the alternator bolts. They are big and strong. Then the blower will need further attachment where possible later. One going to the rocker cover and another to the end of the water pump I imagine. All this will become clearer as the work progresses.
At some point I will have to consider belt adjustment or have an idler gear. If I use flexible hoses to join the various manifolds I may win enough slack so that the blower itself can have some movement, enough to allow a well fitting belt to be nipped up snug enough to stop slip. Again I’ll worry about this later.
There are some good things. The carb can be turned around and a much simpler throttle linkage assembly knocked up. The choke cable is a bit tricky but not too hard. By turning the carb around the fuel lines have a much better and shorter run to the fuel pump and finally the mixture screw and tickover adjustment would be accessible which they are not at the moment. Remember that I have the A112 Abarth engine fitted.
Another down side of the A112 engine is that the rocker cover has the inlet manifold built in which means it’s not a simple matter to change it. I have bought a new rocker cover which will hopefully fit. It does not have the inlet manifold built in but that’s ok because when the blower gets fitted all these things will have to be made anyway. What the new rocker cover will allow is the ability to actually put oil in the engine! With the filler cap as it is now it’s only just possible and that is with the removal of the air filter.
The original air filter won’t fit after the blower is fitted so I have ordered a Ramair one. It is a low profile foam affair. They come in various heights from 25mm to 100mm. I wasn’t sure if with the extra air demand of a blown engine I would need more air filter so I rang the company who said even their lowest version would be good for over 100 hp. Most impressive. I have ordered the 65mm high one. We shall see.
One important thing a supercharger needs and that is a relief valve. It’s there to protect the blower. If the pressure builds up it can get out through the valve. I found a Shorrocks one on Ebay which looks the business. I’ll have to plumb it in somewhere near the inlet manifold.

This is a Shorrocks supercharger relief valve. Should do the trick…
It might take a while to get all this up and running. There is much to search for, pulleys to buy and have machined. Brackets and manifolds to fabricate. Cables to route. All very exciting.
Update August 2015

The door cappings have had many coats of Epifanes marine varnish and have now been installed in the car. They look splendid and are a vast improvement on the original black plastic ones fitted originally. Incidentally I recently found a company selling pattern copies of the plastic trim for about 400€. Ouch. These wood caps were made from teak offcuts I had lying around and some old varnish from another job. In other words they cost absolutely nothing to make! To make them and varnish them probably took about 20 hours in all. But it was a pleasant thing to do and the end result is lovely. Varnish teak is a wonderful wood.

Primo is looking fairly complete inside now that the carpets and wood trims have been fitted. Very satisfying indeed.
Awesome exhaust

Couldn’t resist putting this picture up. It’s for an 850 saloon but it is awesome. It is a Franco Conti exhaust. Very funky anyway. For sale in Italy for 250€
Preparing for a supercharger
Although fitting a suck through supercharger might be one of the easiest forced induction methods it is still very complicated. I have been working my way through the issues and naturally as I discover information about one aspect I learn about something else. And naturally the Internet is full of conflicting information and it is not always easy to work out the reliable from the bollocks.
That said it’s a process like any other and can be broken down into sections. The first part is the mounting and driving of the unit. To that end I have mounted a 125mm A section V pulley onto the crank pulley which is pretty much the same size. I bought a solid pulley with a taper lock bush hole. I didn’t bother with the actual bush as I wanted a big hole in the centre for access to the crank nut.
There was a shoulder on the back of the pulley which almost exactly matched the hollow on the crank pulley so with some careful filing down on them both I was able to make them mate rather nicely. Then I drilled and tapped three M6 threads so I can bolt in in position. Hopefully it will all be strong enough and stay put. I can’t imagine there is a huge amount of force on the supercharger when it’s running.
The mounting of the Supercharger will become more clear when I get that far. Now at least there are two pulleys to line up. I’ll have to wait until the engine is back in the car as I am unsure how much clearance there is between the pulleys and the back panel where the rear engine mount is.
One subject that is very confusing is that of compression ratio. Talk to some and they will say that you don’t want high compression because it makes detonation more likely and one thing that is agreed with all these articles is the fact that detonation is to be avoided at all costs. There are many things that can cause it. The octane of the fuel has a big effect, here in Europe we’re pretty lucky as we have 98 octane which should help a bit.
The spark plugs need to be changed and colder plugs fitted. If this is not done the plugs can heat up so much that they can cause pre ignition and that can be very bad. High compression is also an issue, not that high compression on its own is necessarily enough to cause detonation but it makes every other aspect of the project that much more precise and takes away a hug margin for error.
To lower compression some say you can simply fit a thicker gasket but the jury is out as to whether this is a good idea. If the gasket is thicker, in some ways it could make it more likely to blow out but more worrying than that is the way it will affect the squish of the combustion chamber. This is the distance between the head and the piston and strangely enough by making the squish gap larger (as if fitting a thicker gasket) can actually cause detonation. Not surprisingly there is not much reliable information about this. At least not about old push rod engines anyway!
Running an engine lean can also have a devastating effect on a blown engine. Too rich and you lose power. Too weak and you create heat and can burn holes in pistons. Because of the high static compression of the A112 engine (10.5-1) I don’t have any leeway and simply cannot afford to get this wrong. Some say that high compression on its own is not a problem if everything else is bang on. So running a moderate boost, colder plugs, slightly retarded ignition, high octane fuel and the right mixture means that it could work with the existing compression without having to consider changing or machining the pistons to reduce compression.
This leads to some interesting issues, namely, how to calculate the mixture needs. As it turns out there is an air/fuel mixture gauge that one can use to accurately read what is going on in real time. Here it is.It costs about 200€ but compared to the price of a new engine it is very good value. Jets are available for the 32DMTR weber so using the gauge I should be able to set the mixture up correctly. The 123 distributor means I can accurately control the timing so really the only one worry is the high compression.
Once the conversion is done, and assuming that it works well I will be able to publish all the information, jet sizes etc so that others could replicate it should they want to. If I am going to go to this much effort I certainly want to share it with as many people as possible!
Engine and gearbox goes back in in a few days time. New drive shafts, boots, gaskets, clutch release bearing and reverse light switch on the gear box. New oil pump, timing chain, clutch, rear crank oil seal, and aluminium oil sump on the engine. New gaskets too so hopefully it will all be much better once its back together again with all those little issues sorted. I’m looking forward to going for a drive. It’s been months. I haven’t wanted to go out on the roads with all the tourists out there but now that most of them have gone back to work/school things are much calmer.
Update Sept 2015

Much work done. The engine ready to go back in the car
It’s been a few weeks but finally the engine and box can go back in the car. Much has been done. New gaskets and seals abound. It’s about as good as it all can be. Now fitted with new Magnacor plug leads and a Ramair filter.
Some will tell you that putting an A112 engine in a Fiat 850 sport is not so difficult. To do it well certainly is. I didn’t do the conversion so I can’t know for sure what was done but I have been surprised at just how many small issues there were from aligning the fan belts to fitting the correct oil pump.

The pump on the left was in the A112 engine. The one on the right is a standard Fiat 850 pump.
This is all a bit misleading. The PO said that the pump in the motor was an 850 one but I don’t understand that although in some respects it would have to be since the pump must be turned in the correct manner to work. I assume that an A112 pump would not work as the engine rotates ant clockwise but in the A112 it would turn clockwise.
In any case I would have been happy to have kept the original pump but I also wanted to refit the original alloy sump which is smaller and better looking and the original pump was fouling the side and the bottom of the alloy sump. One solution would have been to cut out a small section from the pick up pipe and re-weld it up. But I suspect that trying to weld up old alloy that has been sitting in oil for years may turn out to be problematical. Although the pump worked fine I saw no harm in buying a new pump anyway.
What I didn’t realise was that the 850 pump has no oil pressure relief valve built in. The valve is there for when the pressure is too great. It’s basically a spring which pushes down on a plunger. When the pressure is enough the plunger is pushed open and oil is released directly into the sump. In the end I bought a Fiat 600 valve and welded it to a plate which I then bolted to the pump. Originally the pump had a tube which joined up to the side of the block where the valve would be screwed in.
All this just to be able to fit the original alloy sump! But I’m pleased to say that now it is back on the engine and looks a lot better and has also increased the ground clearance a bit. I’ll know soon enough if the valve and pump is working once the engine is up and running again.

Not the most elegant of solutions but strong enough. No reason why this won’t work. The valve came with two springs, one very light, much like the original pump and another much stronger spring that wouldn’t operate until the pressure was very high. I fitted the lighter spring.
Engine and box back in the car tomorrow. Looking forward to going for a drive.

The engine back in the car.
It took a few hours but finally the engine and box are back in the car. For some reason the drive shafts I bought were too long so I had to put the old ones back on. That was a bit of a pain. I thought all drive shafts were the same length on all 850s. It would seem not!
The engine runs lovely. I can only assume that the oil pump and relief valve are working ok as I went for a drive and thrashed the life out of it and there were no problems. What is particularly encouraging is the fact that now the cooling system is back to how it should be the engine does not overheat at all. It didn’t even blow any water out of the radiator top. This is excellent news.
Next up the supercharger!
Update Sept 2015
Nothing is ever simple. Ever since I put new wheel bearings in at the rear of the car there has been play. The bearings are unusual in that they are not tapered so cannot easily be adjusted. I have been asking on the Yahoo group about this but as usual there is much conflicting and strange information.
There is a spacer that fits between the bearings and some say it is a crush bearing deigned to collapse slightly and this helps to remove play in the bearing. Since the bearings are not tapered I don’t see why a crushed spacer between them would remove any play. Some say this system is only for early 600s and they had a problem with the spacers crushing too much and then wheels falling off or something equally unpleasant.
So if the spacer has nothing to do with anything how on earth does one remove the play from the wheel? The outer bearing is a 614172/C3 and I was told that the C3 referred to the kind of cage that the bearing used. Someone on the group pointed out that it is a play setting. CN is the normal range of play, C3 has more play in it than a normal bearing. Why one would need varying types of play for a bearing I don’t know. No one can tell me. Can I find a 614172/CN for sale? No I can’t.
The latest is a comment that suggests the bearings should maybe be pressed on to the shaft. This would swell the race slightly and maybe it would be enough to remove the play. I really don’t know and no one can tell me. It’s easy enough to buy bearing kits for the rear of an 850 sport but as far as I can tell they all use the C3 setting on the outer bearing.
So despite all this information I am still non the wiser about how to solve the play that I have on the rear wheels. If anyone reading this has any idea, please would you comment so I can sort it out? Thank you. Who ever knew replacing a bearing could be so hard!
Shocks
Last year I bought a pair of Spax adjustable shocks for the rear of the car as the OEM ones I bought were hopelessly soft. According to the manual the shocks have different rates front and rear which makes perfect sense as the back is much heavier than the front of the car.
The new Spax made a huge difference and are currently set on 12 clicks from their softest setting for a comfy yet firm ride. There are 28 clicks in all. Then the front OEM shocks started to make some noise so I decided I might as well buy some Spax for the front too, at least being adjustable I could set the car up as I wanted.
Not so. As bloody usual there is a problem. The shocks are fine, or at least they are working as Spax intended but what I did know when I bought them was that Spax use the same valve settings for front and rear shocks which is just plain stupid if you ask me. Even on the softest setting the shocks are way too stiff. I can barely push the front end of the car down by hand and going over the speed bumps is dreadful. They have to be taken at a very low speed of the car crashes over them.
Obviously I have written to Spax and they are going to let me know what can be done. I got the usual bollocks about how they have sold thousands of shocks and never have any problems. Well here is a problem and anyway if they have sold thousands without issue then it shouldn’t be a big deal for them to sort out one lone customer should it.
The company I bough them from DC Performance in the UK seem to think the shocks are fine and they will not take them back just because I think they are too stiff. They are supposed to be 25% stiffer even on the softest setting. I’d be happy with this but even on the softest setting they are at least twice as stiff. And anyway, they can hardly be described as adjustable if they can’t be adjusted in both directions!
The rear shocks work fine. Soft on the sotfest setting and firm on the hardest setting. Exactly as they should be. To use the same settings on a car with 35% of the weight of the car at the front and nearly double that at the back is just nonsense. Hopefully they can sort them out and make them work so that my fillings don’t fall out every time I go over a bump!
Driveshafts. It seems that the shafts I ordered are for a Fiat 850N whatever that is. They measure about 45cm whereas the 850 sport driveshafts measure 43cm. Who knew? So I’ll have to order another pair the right size and fit them. What a hassle. Still, every time the car comes apart and goes back together, I learn a bit more and it gets smoother and better. It’s now a fairly civilized little car to drive.
Update September 2015
The shocks went back to Spax who finally agreed to sort them out. They duly came back and are softer but still way too hard for real world driving. So back they will go again. This time I’ll send an OEM shock so they can match it up properly.
Got the right length driveshafts which I can confirm for a Fiat 850 sport coupé are 43 cm long.
Finally solved the rear wheel bearing play issue. The C3 suffix which is printed on the bearings I bought refers to the play that the bearing will have. In fact what I needed was a plain bearing without the suffix. It would appear that many of the people selling bearings on Ebay and other places have got their facts wrong. Now that the normal bearings are fitted there is no play at all in the rear wheels and the car rolls very smoothly.
The welded and modified water pump sprung a leak. Welding cast alloy is notoriously hard due to the high levels of magnesium in the mix (‘I’m told) and this makes it hard. So I removed the pump again and got my mate to weld it again! But this time I thought I would be clever and remove the pump shaft etc so that we could really give the weld some penetration without worrying about melting the seals etc. But sadly I broke one of the seals which has a Bakelite washer and was unable to put the car back together.
Now I have to try and work out how to rebuild the pump. Most people replace the whole thing but that won’t work for me as the pump body has been modified so I have no choice. It seems though that the seals are either pressed in or glued in or both. As normal I cannot find anyone who can tell me. Someone suggested they are pressed in using Red Loctite. Perhaps that is true. I need to do more investigating. At least the seals are available!
Update Oct 2015
Managed to fit the new seals in the water pump easily enough. They leaked for about ten minutes until they wore in a little. The car has been driven far and wide, slowly and fast and I am delighted to say that the cooling system is excellent and the needle only rising to about half way when the engine is turning very slowly. It certainly seems to cool more when the revs are higher. In any case the car no longer over heats at all. This is excellent news for the supercharger.
The Spax shocks have been back to Spax a couple of times but they are still too stiff. On the car the ride is just not good even on their softest setting. I do not know why the OEM shocks work fine but the Spax do not. I think I will just have to give up on them as the cost of shipping them back time and again is getting a bit much.
Update December 2016

It has been a long time since I updated this blog. Why is that you ask? Well to be honest I haven’t really done much to Primo in over a year. He gets used a lot and has been completely reliable and now that it’s mechanically sorted drives really nice.
The 123 distributor is excellent and at 4000 revs the engines spins so sweetly. Although not a fast car by any stretch of the imagination it still has the ability to surprise a few people, especially on the tight twisties. But the best bit is, being so low and so noisy and with a speedo that over reads massively the impression of speed is very high but a quick glance at the speedo with adjustment for error shows a laughably low speed completely at odds with the feeling behind the wheel.
The Supercharger still sits in a cupboard while I consider the options. In order to do the job properly the compression ratio really needs lowering but from what I have read, the only reliable way to do this is to fit dished pistons although these are proving hard to come by. Most aftermarket pistons get progressively more domed. Maybe it’s possible to find something but without taking the engine apart I can’t find out what size the pistons are and as the engine is running so well I’m loathed to touch it!
Of course I have looked in to Electronic Fuel Injection and there are a few options though nothing like the choice I might have if I owned a big American V8! You can buy a fuel injection system that just bolts on in place of the carb. Plus, they are self learning so fit and forget. Sadly there does not seem to be much in the way of self learning stuff on a smaller scale. So what that means is expensive and complicated setting up on a rolling road.
So for now the supercharger will stay in the cupboard until the engine needs to come out and in the mean time I will just enjoy driving Primo. Wherever he goes people love him. He really stands out with his tiny size, all that chrome and the bark from the exhaust…
When there’s something new to report I’ll update again.
Update Jan 2017
Gradulux rear window adjustable venetian blinds

The sun is brutal in the Med and any car left outside will suffer from sun damage especially the interior. The rear screen on the Fiat 850 sport is very angled so the sun beats in mercilessly. A simple though ugly way to protect the seats is to cover them but it’s far better to stop the sun coming in in the first place.
Many sports cars use a slatted black plastic cover that fits over the back window and it can look very cool. The Lamborghini Miura has and it looks great. This might look great on a 60s supercar but somehow it didn’t seem to be quite right for the Fiat.
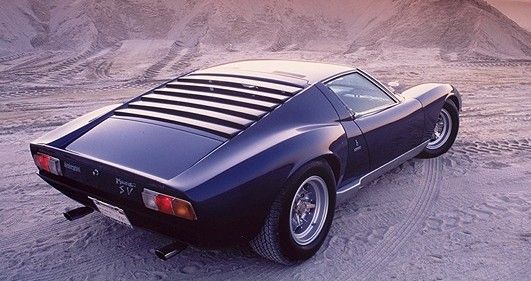
It occurred to me that I could make my own set of louvres but while researching this I came across a few pictures of an old French product from the 60s. Further searching revealed that Gradulux blinds were still made by a little company in Perpignon in southern France.
Their website is simple and there isn’t too much useful info to look at and no way to buy online but there is an invitation to contact the company. Nothing ventured, nothing gained. I emailed to see if they made one for an 850 Sport. To my surprise I received a prompt reply. The price with tax and delivery was about 150€ which is not cheap but there is no way I could make something as nice for so little so I ordered one.
Being an old school company without credit card facilities meant I had to send a cheque in the post! Something I had not done for a very long time. About ten days later a small package arrived containing all the bits needed to fit your blind in your car.
Depending on the size of your back window there are two or four vertical supports to fit to the rear window. It’s dead simple as you just pop the end of the support under the window rubber at the bottom and then slide the top tab in. This simple system is surprisingly effective. Then the bent metal slats are popped in to the rests on the supports. Simple. It took all of five minutes to fit the blinds.

They look really nice and can be adjusted so that they do not restrict your rearward vision at all. The blinds cannot be closed completely as you can with a similar blind in a house but they can be orientated in the opposite direction enough to be able to cut out headlights behind you.
It’s too early to say whether they will rattle with a window open at speed but the slats are well fitted and the vertical uprights are stiff to move without any play. There is no reason why they should make noise.
As far as period mods go, the addition of a Gradulux blind in the back window is a good one. It looks pretty rad and best of all keeps the sun off the seats and heat out of the car but if you want one they sometimes come up on Ebay for the Citroen DS or you’ll have to do it the old school way and send a cheque but somehow even this seems appropriate when you consider the product.