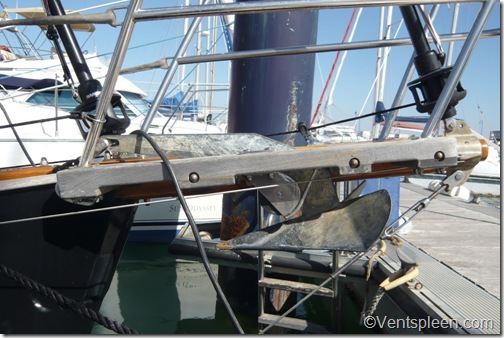
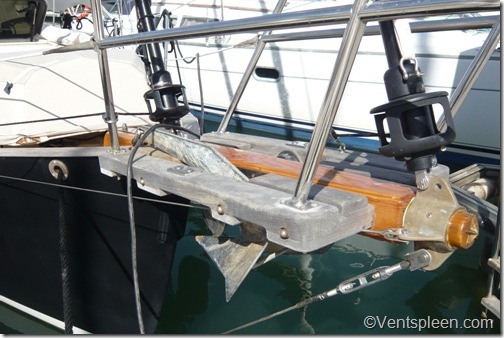
Doolittle’s modified bowsprit platform with Delta anchor (22lbs) in place.
There’s no doubt about it, the Dana is a fabulous boat and Pacific Seacraft built them well. However, one must not forget that the Dana is a production boat and as such she has her fair share of compromises. One of these compromises is the bowsprit platform.
As a platform and a housing for the anchors and the pulpit it works well but it could have been done differently. Of course, I understand why PSC did it that way. They did it like this because it is easy to make and fit.
So what’s wrong with it? I suppose the biggest problem is that it is placed on top of the bowsprit and bolted through. This does mean that it is strong but it covers most of the bowsprit and that means that it makes it very difficult to varnish and maintain the bowsprit. Since there have been some reports of rotting bowsprits it makes sense to find a way to have the same features while offering better accessibility to the bowsprit for maintenance.
Much slimmer platform when bolted to the sides of the bowsprit and not bolted to the top. Less weight and windage.
It’s my belief that the majority of rotten bowsprits stem from the fact that they are extremely difficult to see and maintain. If something is hard to look after it tends to get neglected.
The main reason I modified my platform was because I am not a fan of the CQR anchor and wished to use a Delta instead. The problem is that a Delta won’t stow properly on a standard platform as the flukes of the anchor strike the underside of the bowsprit. In order to make the Delta fit correctly it is necessary to not only lower the platform but also to modify the anchor roller.
You might think that this is a lot of work just to allow the fitting of a certain anchor but we spend a lot of time at anchor so the need for the right ground tackle would have been justification enough but in fact there are a whole host of advantages to going down this road.
The much slimmer new platform, now bolted to the sides of the bowsprit and not to the top as before.
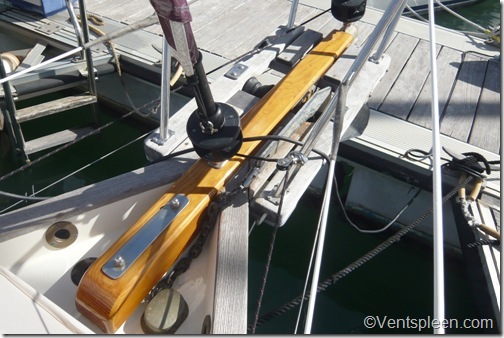
The platform is basically taken off the top, a centre section (the width of the bowsprit) is cut out of it and then it is bolted to the sides of the bowsprit. This reduces weight right at the bows of the boat and that is always a good thing. After all, the bowsprit and platform is a massive and very heavy assembly so any weight that can be removed from it pays dividends in performance.
Also by placing the platform on the sides, it reduces windage as the bulk of the platform is massively reduced. There is an aesthetic component too which is that the teak capping where it meets the bowsprit is now visible where as before this nice nautical feature was completely hidden by the platform. The aft end of the platform also needs to be cut away to match the shape of the hull and the capping. See below.
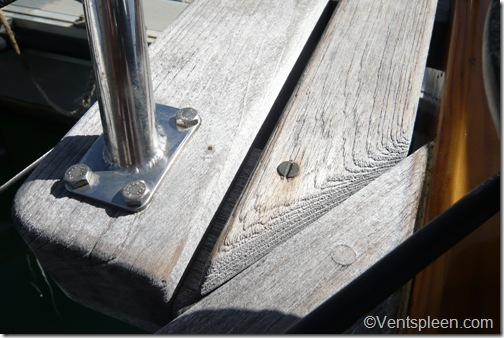
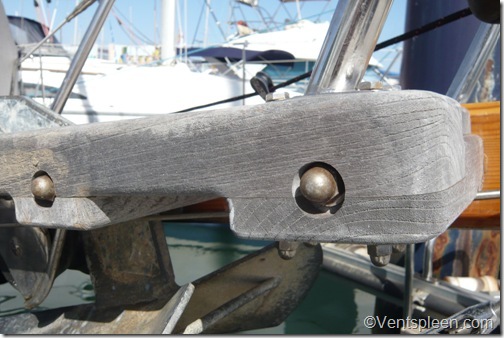
The back end of the platform will need to be cut at an angle to allow it to go in the right place. Three bolts hold the platform to the bowsprit. There are no bolts at the back end. It does mean that there is a little flexibility in the platform but it is held strongly enough with the other bolts so it’s not a problem. I also replaced the two thinner infill pieces with one wider piece of teak as they would not go back on well without looking too fussy.
The underside aft of the platform showing the wood cut at an angle. There is no need to attach the platform to the hull at this point but you could use sikaflex if you wanted a bit of extra stiffness.
Does lowering the platform and the pulpit affect anything else? No, in fact it helps. I always felt that the life lines went up too far at the bows but by lowering them they look much better and follow the sheer of the boat much better.
Aesthetically, the whole bow of the boat looks better and less bulky. Even lowered the lifelines are still higher than at any other part of the deck and to my mind the whole thing just looks right.
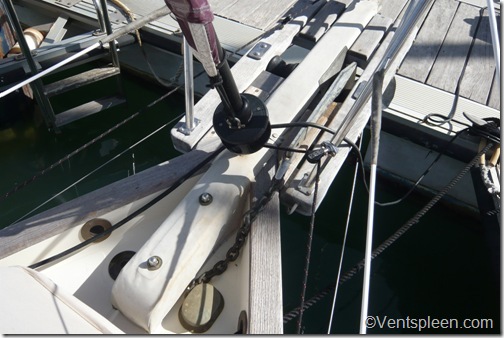
The best part is that the top of the bowsprit is now visible and much easier to get to and maintain and varnish. It just looks so much better.
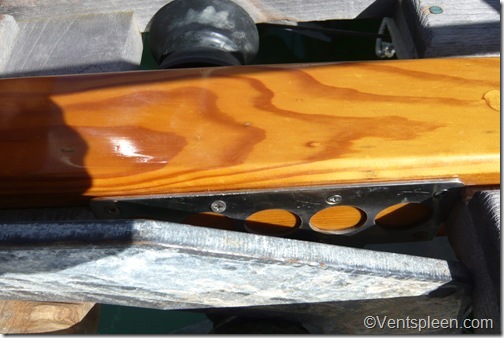
The bowsprit is now fully visible and much easier to get to for varnishing. Plus it looks much better all round. The Metal plate with the holes cut in it for lightness is to protect the varnish and bowsprit from damage caused by deploying and retrieving the anchor.
There are a few other small advantages as well that may apply. For example the lower platform allows the jib furler to be attached without using an extra toggle. I can’t be sure about this and it may only apply to the Harken furlers that I fitted but I suspect that with the platform in the original position the furler drum would foul against it. With the platform lower, this is not an issue.
The staysail chainplate originally bolts to the top of the platform but with the platform bolted to the sides of the bowsprit it must be bolted directly onto the top of the bowsprit instead. This has the effect of making the inner forestay longer. Since the Harken furlers (which I have fitted to both stays) require that the stay be cut down by a couple of inches, it meant I did not have to cut it down! If you already have furlers fitted or do not wish to fit them you will have to either get the inner forestay made longer or add a toggle to extend it slightly.
Staysail chainplate now bolts directly to the top of the bowsprit. Before it was bolted to the top of the platform. Its position is unchanged, just lower and uses the same holes. Note also the way the capping is now visible right up to the bowsprit. Before this nice feature was hidden.
Removing the platform is straight forward although you will find that PSC never skimped on sealant thus getting some of the bolts out can be hard work. The easiest way is to use washers and nuts to gradually wind the bolts out. It takes a while but is the easiest way and does no harm to the woodwork.
In order to get the platform off one needs to remove the lifelines that attach to the pulpit and unbolt it. The electric cable for the nav lights will need to be disconnected. You may have to cut the cable inside the boat and reconnect it later.
The bowsprit will have holes in it which will need plugging since the new mounting holes will be through the side. This is not a big deal.
The first thing to do having removed the platform is to cut out the centre section to the thickness of the bowsprit and cut the aft end to the shape of the bows. There is no need to remove the pulpit but it might be easier if you do. In any case the pulpit does not need to change its position on the platform.
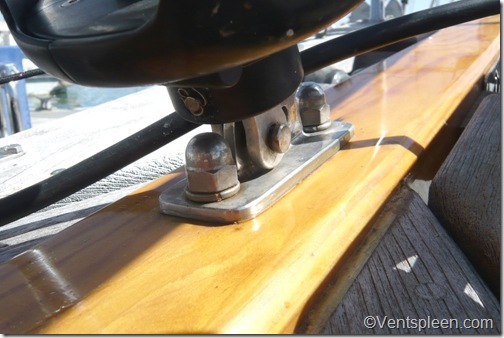
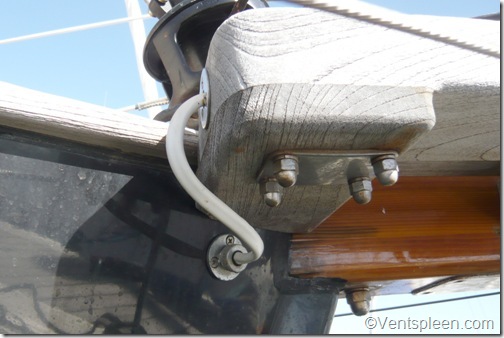
Once this is done the platform can be temporarily clamped in place on the sides of the bowsprit. The height is determined by ensuring that the top of the platform is flush with the top surface of the bowsprit. The platform will be bolted through by three long bolts (studding) with dome nuts and washers through the athwartship sections. (see pics). Check that the original life lines are still the same length. There is no need to modify the lifeline length. You may find that the whisker stays interfere with the underside of the platform at the forward end of the sprit. Cut small grooves if necessary to clear them.
Placing the platform on the sides of the bowsprit means that small grooves may need to be cut for the whisker stays.
Place the holes centrally in each athwartship section. First drill a 1” hole about 3/4” deep for the dome nuts. Then drill right through to the bowsprit. This is the tricky bit. I suggest drilling into the bowsprit an inch or so (or as far as you can with your drill bit) on both sides. Then remove the platform and making sure that the drill is perpendicular to the bowsprit carry on drilling about half way through the bowsprit. Do this from each side so that the holes meet in the middle. If you lack confidence you could set up a drilling jig to ensure that the drill bit cuts straight without wandering. It’s not too crucial if the hole ends up a bit enlarged as you try to find the hole on the other side as the sides of the bowsprit will be covered by the platform.
The bolts that clamp the platform to the bowsprit have recessed dome nuts. This isn’t absolutely necessary of course, they could be left proud.
Once this is done I highly recommend varnishing the holes you have drilled. The easiest way is to drag a varnished soaked rag through the holes. Repeat until the holes are well saturated. The varnish will seal the holes and help to stop water getting in. Not sealing the holes is surely the main reason that Dana bowsprits rot in the first place but as I mentioned before the Dana is a production boat and if PSC took the time to everything to such a level they would be so expensive no one would ever buy one!
Now the bowsprit can be bolted on using new threaded studding cut to the appropriate length and tightened up. Now that the platform is bolted on you can reconnect the lifelines.
The deck gland for the nav lights should be moved from the top of the capping. I placed it un the side of the hull and plugged to holes where it was fitted.
The deck gland is now placed on the hull and not on the top of the capping. This should be better as water cannot ‘stand’ on the gland as it could before reducing the chances of the gland leaking.
That is the basic procedure for the modifying of the platform itself. If you are using a CQR you may not need to do any more. If you wish to fit a Delta then unless you want the shaft of the anchor poking up through the hole at an angle you will have to lower the starboard bow roller. I left the port roller at the original height as I often use that for mooring lines in the Med.
For this you will need to modify the original brackets as shown in the pictures. The edges of the new brackets need to be well rounded or the anchor warp or chain will snag as the boat tacks at anchor making it very hard to pull in unless the chain is dead ahead.
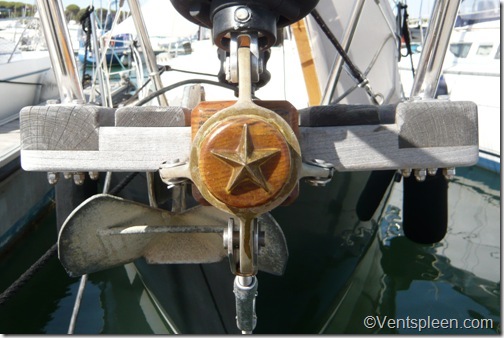
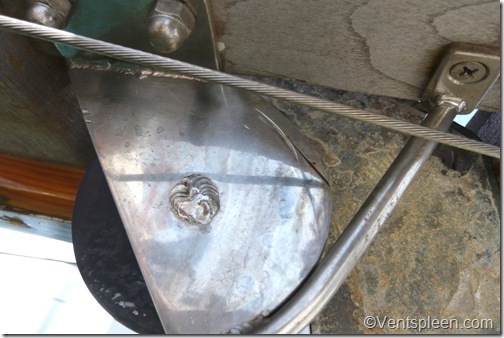
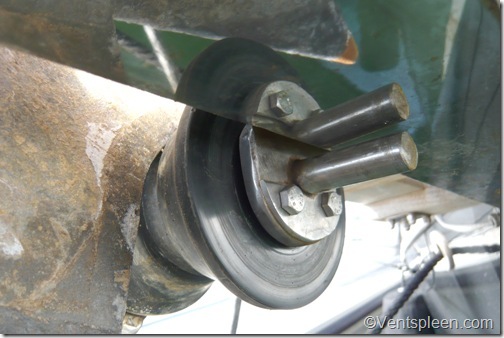
This is the stb bracket which had to be completely remade. The only part which remains is the axel for the anchor roller. It has been lowered considerably to allow the shank of the Delta to rest under the bowsprit without touching and to allow the shank of the anchor to lay almost flat on top. Note the bar welded onto the front edge of the bracket. This is needed so that the chain or rode can be brought back on board when raising anchor without it snagging.
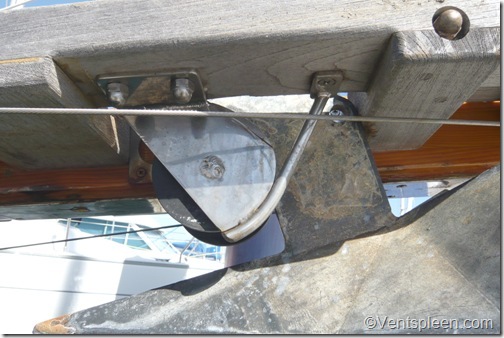
Here is a close up of the stb bracket. The axel is below the level of the bowsprit and so that needs supporting as the possible forces here are quite large. See the picture below for details.
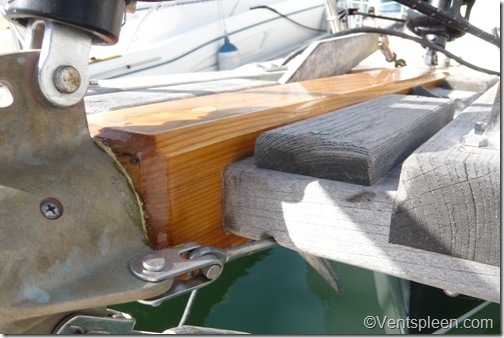
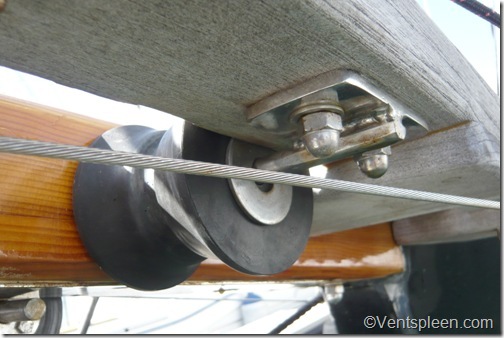
This picture shows the inboard side of the Stb bow roller. The axel is ‘locked’ in place by having a groove cut in it and a ‘C’ shaped piece of stainless which fits into the groove held in place by a couple of threaded bolts. This stops any lateral movement.
The port side anchor roller. This is left at the original height using the original bracket. The end of the axel simply goes into a hole drilled into the bowsprit and that has proved more than strong enough as it goes in a good inch or so. Washers were placed either side of the roller to ensure that it never grips the woodwork, nor damages the varnish.
And that is about it really. Below are a few more images that may help with positioning etc.
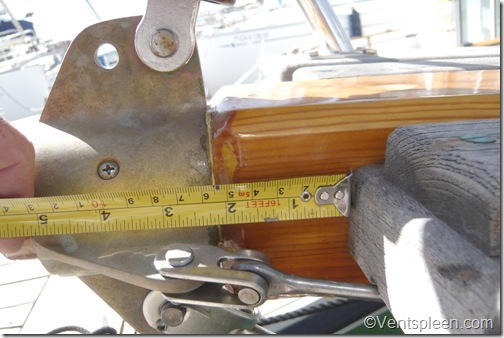
On Doolittle, the platform starts 2 and 1/8” behind the back edge of the bronze end fitting. It may be that each Dana is slightly different so use this measurement with caution.
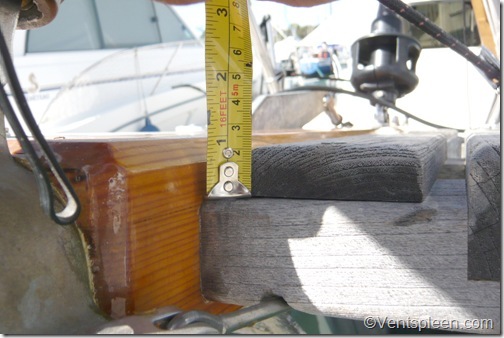
This picture shows the position of the athwartship pieces of the platform in relation to the top of the bowsprit. I made it 7/8” on Doolittle. It may be different on other Danas.
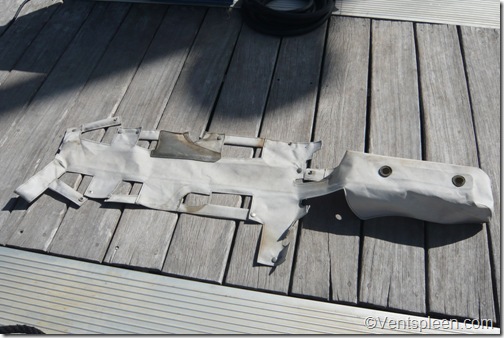
One of the best advantages to this modification is that it is now possible to make a cover to protect the bowsprit from the sun. Admittedly it is somewhat elaborate but with poppers doesn’t take more than a couple of minutes to fit.
The bowsprit cover in place protecting the varnish. Being made of Sunbrella it is able to breathe and being of a light colour it keeps the heat off the bowsprit too reducing the amount it can move.
Another shot of the new platform showing how the Delta lies almost flat on top.
Interesting, I am thinking about what I am going to do with my anchor rollers, I want to extend them on some sort of plank either side of my bow sprit so that when I’m weighing anchor, the anchor doesn’t chip the bows. Well thought out solution and top execution of plan. Anything that improves handling is worth all the effort.